How We Rebuilt the Hege Website to Get a Perfect PageSpeed Score. Part 1: Big Picture
Nailing the PageSpeed Insights performance metric takes a bit of work, but it’s totally possible. Even for a slightly traumatized webmonkey with a penchant for furry ears.
Chillest Monkey Left Alive
Our resident webmonkey here in the Hegequarters is generally a pretty chill dude. Sleeps in late. Eats a couple of bananas. Cracks up VS Code and taps out a little CSS and HTML dance. Goes for a swing in the backyard oak. Flirts with the neighbor’s lady Cocker Spaniel (don’t ask).
Pretty chill dude. Unless you get him started on one thing.
Slow websites.
Yea. For some reason he’s got a real hang-up when it comes to slow websites. And we’re like, yea we get it, slow websites suck. But dude. Stop ranting about it every. single. fucking. day.
Finally, one particular Tuesday not too long ago, enough was enough: whatever past trauma our poor boy had suffered, it was time he faced his demons.
We gave him an ultimatum: make us the fastest memecoin website on the planet, or no more Chiquitas for you. No sir. No excuses this time.
He muttered something under his breath, and somewhat reluctantly retreated to his monkey lair. From which over the next 6 weeks a faint stream of furious typing could be heard, intermitted by the occasional semi-coherent rambling about image compression, media queries, font subsetting, cache lifetimes, and something something about Bill Gates.
Finally, on the seventh week, he emerged. A gleam in his eye and a big wry monkey grin plastered across his face.
“Boom”, he said, in a somewhat cringe but endearing imitation of the late great master.
Really!? Had he succeeded?
Well, we’ll let the numbers speak for themselves:
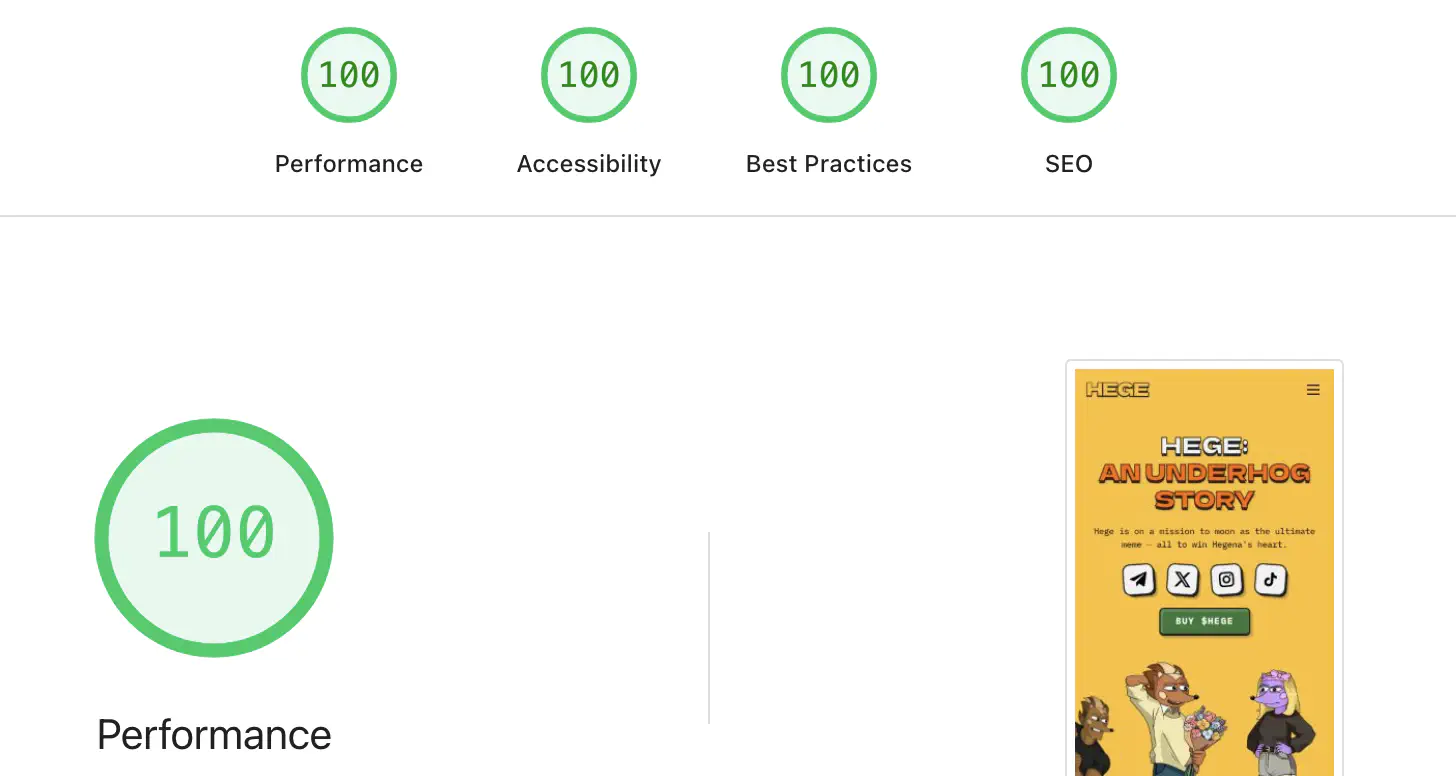
There you have it. Possibly the fastest memecoin website on the planet.
Surely, a small step for mankind, but it did put the pep back in our monkey’s step.
Now, of course this metric isn’t perfect (more on this later). No metric is. But if you nail this performance score, you can be sure that your website is pretty damn fast.
So hats off and well done web monkey. From now on your title will officially be known as Head Speedmaster Monkey. Wear it with pride!
We’re also happy to say that after some amount of persuasion, possibly involving a shipment of prime Thai bananas of the ladyfinger variety, our new Head Speedmaster has also agreed to share the tricks and techniques he used to pull his feat off.
So read on for the full run-down on how our furry friend nailed the perfect PageSpeed score. We’ll start with the big picture, and then go through each piece of the tech stack in turn, detailing everything he did to make the new Hege website qualify for world class top performance.
Understanding the PageSpeed Performance Metric
First off, let’s get a basic understanding of what PageSpeed Insights actually is.
In short, PageSpeed Insights is a tool built by Google that you can use to analyze the performance of your website. It uses a software called Lighthouse to simulate how your website behaves, both on mobile and desktop devices.
After running PageSpeed, you get a report that covers four areas:
- Performance
- Accessibility
- Best Practices
- SEO (Search Engine Optimization)
This is what the report looked like for the old version of the Hege website, before our dear Speedmaster got to work. Not great.
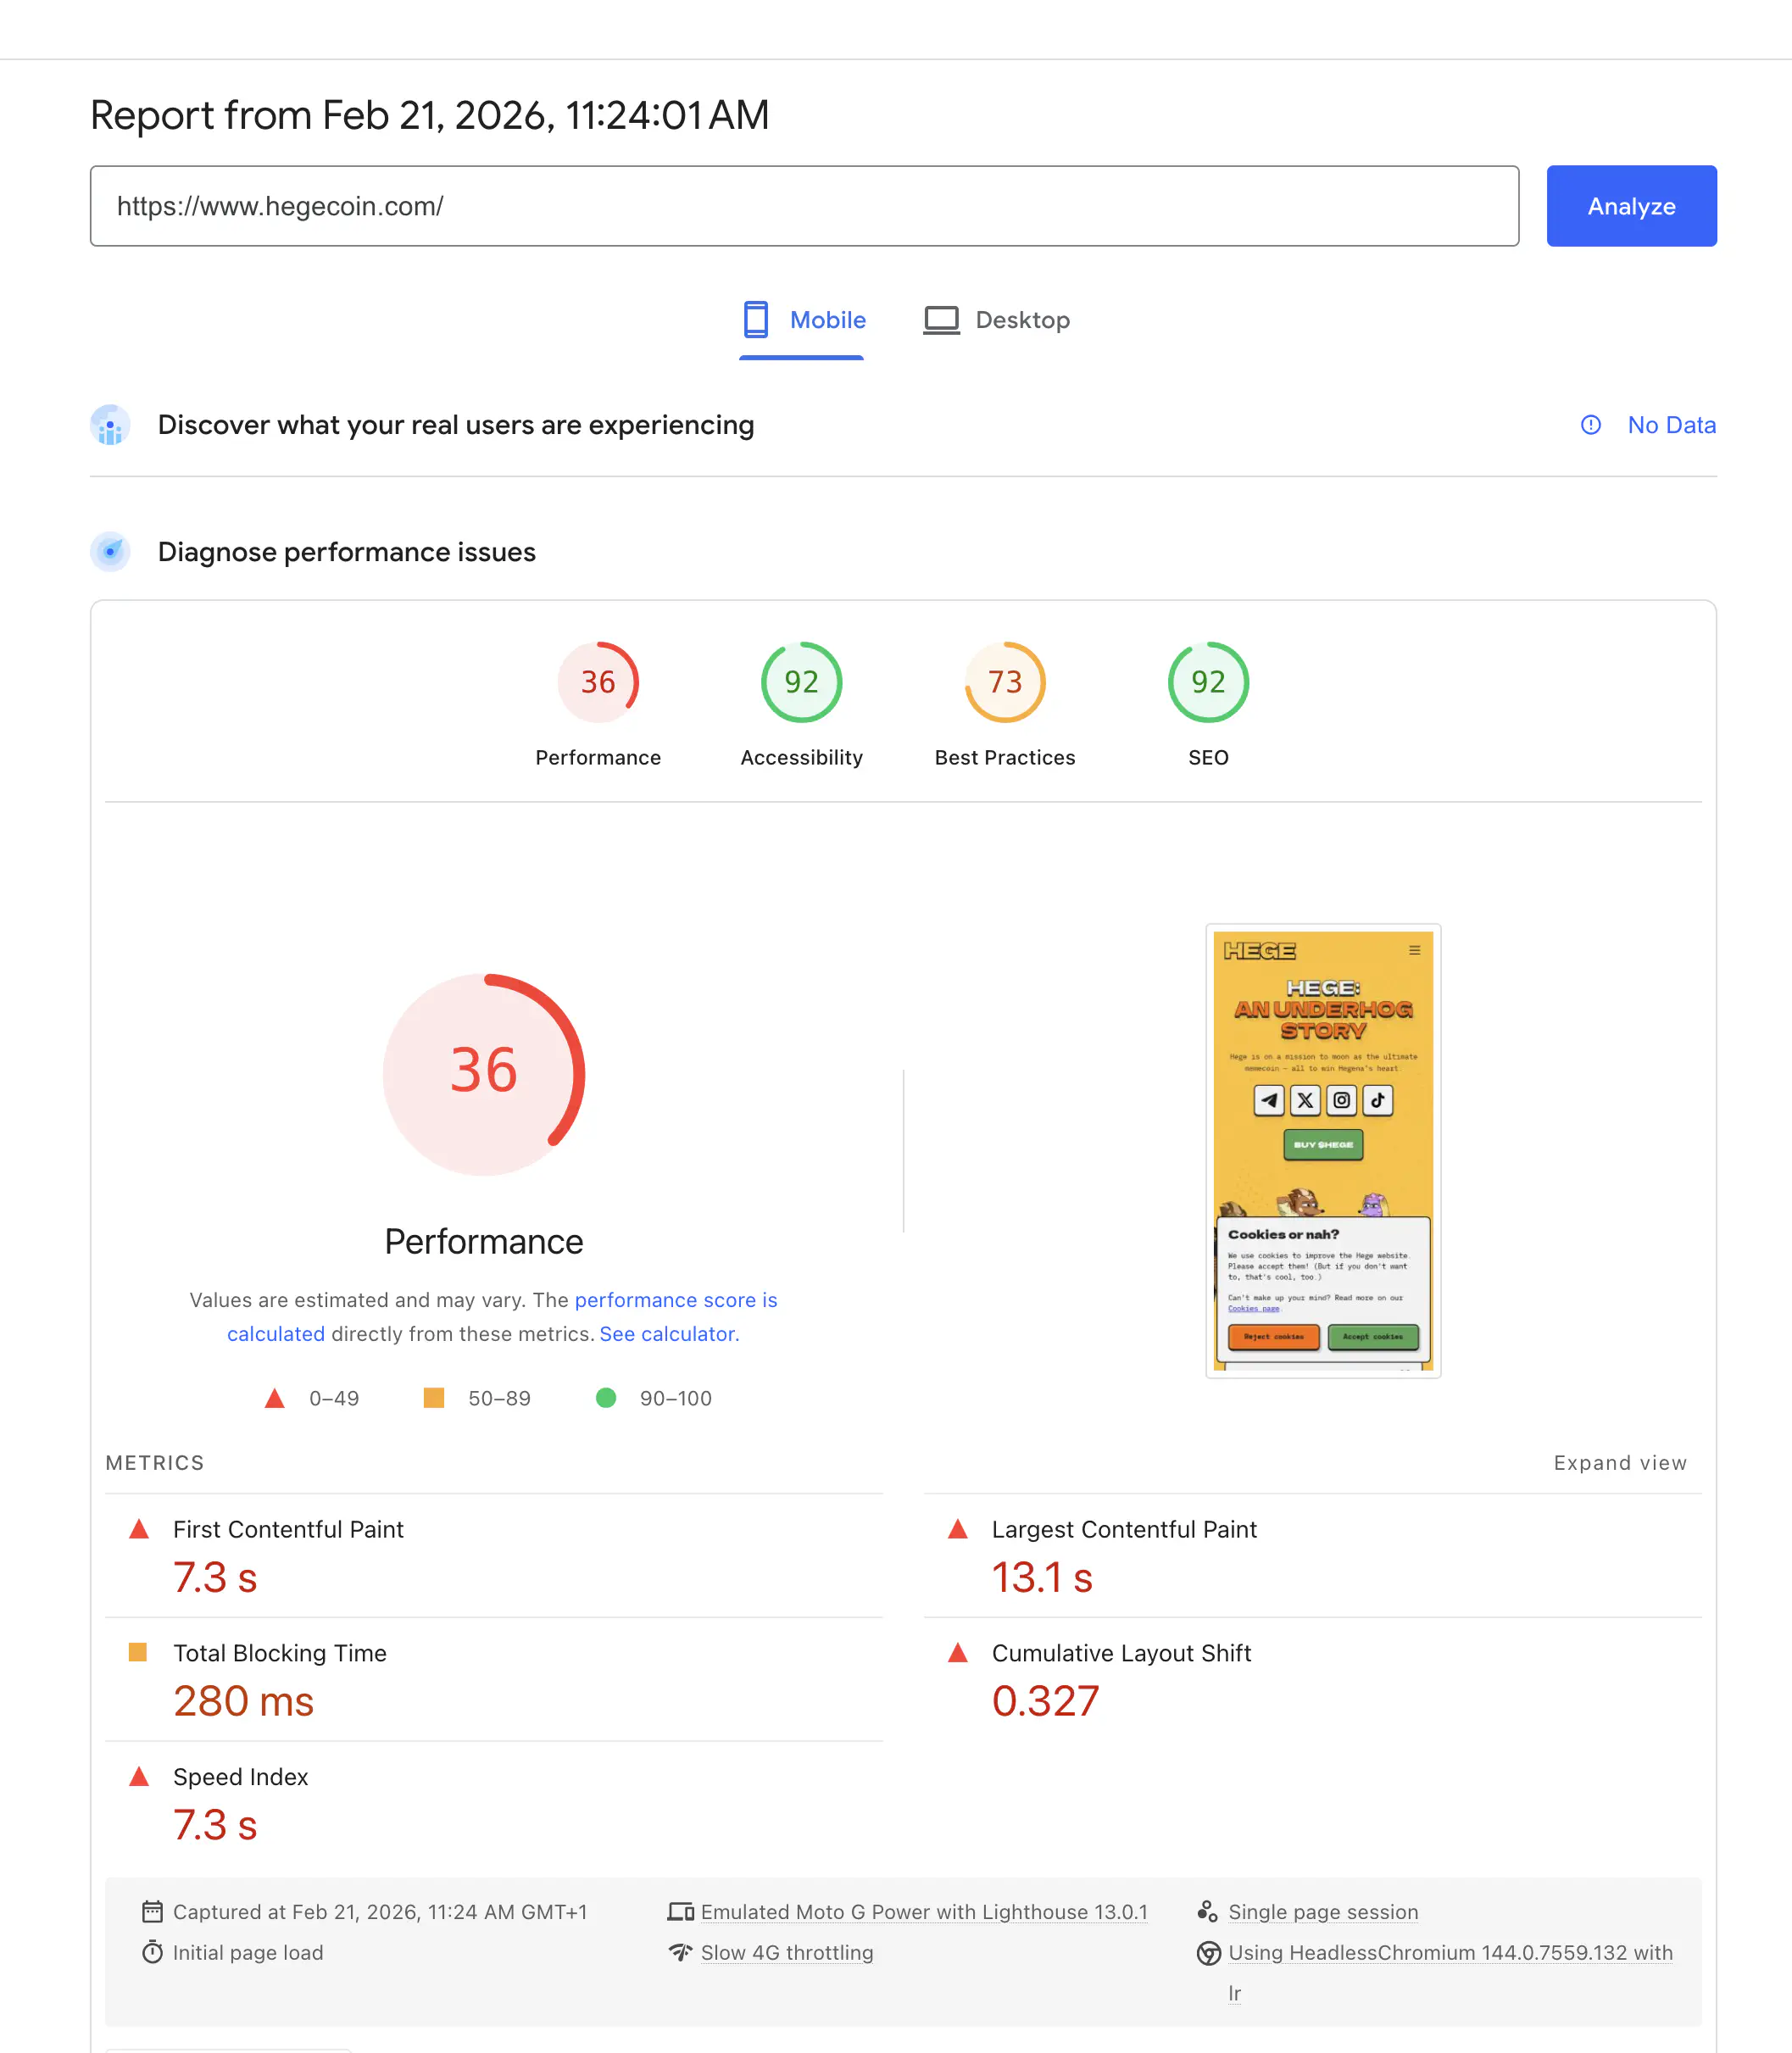
Out of the four areas covered by the PageSpeed report, the performance part is the only one that takes real work to score high on. The other parts are relatively easy to nail by following standard practices, so we won’t focus too much on those here.
As for performance, perfecting this metric boils down to two things:
- Make the browser render the initially visible part of your page as fast as possible.
- Make the page render smoothly, without shifting around as it loads.
So in other words you need to make your page load fast, and you need to make it load smooth.
Simple enough.
At a high level, you need to focus on these two things to make this happen:
- Send the right things to the browser, and send them as fast as possible.
- Write your HTML and CSS so that the page renders smoothly.
The rest of the articles in this series will cover all the details about how to actually make these two things happen.
With that said, no more beating around the bush. Let’s fry some bananas.
Step 1: Build A Static Website and Host it on a CDN
There is nothing faster than delivering static HTML through a fast CDN (Content Delivery Network). So that’s what we went for.
Level 1: Static Website + CDN
For a simple website, static HTML is all you need. Use a static site generator (SSG) to make this easier to handle. There are many alternatives available, written in various programming languages. In the end we settled for Hugo, because it’s mature, fast, and easy to install. The documentation is decent, too.
For hosting, we tried both GitHub Pages and Cloudflare Pages. They’re both free, and they’re both fast.
Cloudflare Pages was the winner though, for two reasons: 1) they’re free for commercial use (GitHub Pages is not), and 2) they let you set custom HTTP headers for optimal caching.
Level 2: Fingerprint Assets for Optimal Caching
The absolute biggest performance unlock will be to host static HTML on a CDN as described above. But if you want to improve further, you can fingerprint your assets.
This will actually not impact your PageSpeed score, as that only measures loading your website cold, with no prior caching. But fingerprinting will speed things up for repeat visitors, so it’s totally worth doing.
So, what’s fingerprinting?
Your page will have lots of different assets, like images, JavaScript, and CSS files. Fingerprinting these means that you put a hash of the asset file into the filename of the asset.
Most static site generators have built-in functionality for this. In Hugo for example, use the built-in fingerprint function:
{{ with resources.Get "js/main.js" | minify | fingerprint }}
<script type="text/javascript" src="{{ .RelPermalink }}"></script>
{{ end }}
This will take js/main.js and turn it into something like this: js/main.min.5bff2b158c8f9f94a04e5170a0b48d3d14e7025fd94678eeb2474080ef4e2d6f.js.
Okay. Neat. But what’s the point?
The point is that putting a hash of the file into the filename means that you will never have a problem with stale caches. Because whenever the content of the file changes, the filename changes.
You can then tell browsers to cache the fingerprinted assets as long as possible with no worries about caches not updating as needed. On Cloudflare, we do this with a special "_headers" file:
/*.js
  Cache-Control: public, max-age=31556952, immutable
Setting this HTTP response header means that all our JavaScript files will be cached for 1 year (maximum time), and that the browser never even has to revalidate them. It will simply pull the files straight from cache the next time the user loads the page, with zero network overhead.
Level 3: Go Low-Carb (Say NO to Cookies)
After fingerprinting, there is one more thing you should consider: getting rid of cookies. This might not be possible in your specific situation. But if it is, do consider it.
In our case, we realized that we don’t need cookies at all. The extra analytics data we can get by using cookies just isn’t worth the trouble. And by skipping cookies, we can get rid of the annoying cookie popup. This has two benefits, both important:
- The page renders faster.
- We don’t annoy our visitors.
Besides the speed-up, not annoying our visitors is the huge win here. You want your first-time visitors to have a great experience when going to your website. If the first thing they see is a big banner that they have to click away, that completely ruins the experience.
Being annoying is very much not the first impression we wanted to give, so we simply got rid of all cookies. Win-win.
Step 2: Optimize Fonts
With these things in place, our primate friend tells us that the next thing he turned his attention to was to optimize fonts.
But. This monkey is tired now. So this was all you get for this week. Tune in next week for part 2 of the series, where we dive into how self-hosting and subsetting fonts can be the biggest speed unlock you can make.
Until then, have a great week, and make sure to jump into our Telegram and say hi to all the Hegends there. Good vibes guaranteed!
— Team Hege
PS. Check out the piece “Lightbringer” below. This collectible is up for sale on DRiP!
